Video rendering in HTML5

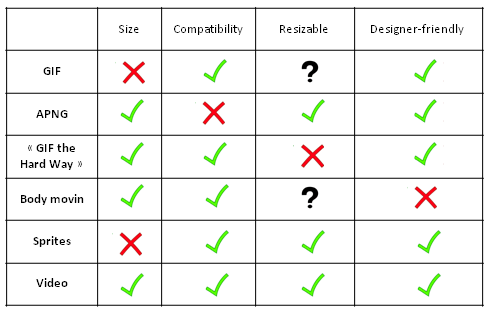
After our thorough study of different web animation techniques for thehalvening.com, we finally opted for displaying a video.

The H264 encoding squeezes our 10s loop animation in 1MB with an HD resolution.

The web integration is direct thanks to the video HTML5 tag:
<video preload='auto' autoplay='true' loop poster='img/phase1-large.png'>
<source src='anim/phase1_1080.mp4' type='video/mp4' /></video>

The video is displayed over a uniform background to give a fullscreen-like rendering.

At the first test though, we noticed a slight but annoying color difference between the background and the video:
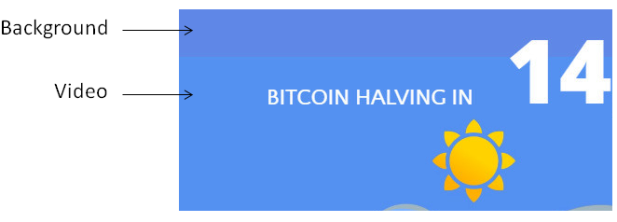
diff couleur legende
Damned!

Looking at the RGB values, we understood that H264 compression has modified the colors. The beginning of a long walk in the valley of the shadow of death…

1st attempt: Laziness. We replaced the background color by the one of the compressed video. Worked well on a PC but not on a Mac.

2nd attempt: We tried a little javascript trick to set a specific background color for Mac users:

var isMacLike = navigator.platform.match(/Mac/i)?true:false;
if (isMacLike){
+++$('.main section.page1').css('background','#6C9EEB');
}
else{
+++$('.main section.page1').css('background','rgba(90, 144, 236,1.0)');
}

It worked…until the bug appeared again on another PC. No escape, this time we’re gonna have to use our neurons..!

3rd attempt: After a little bit of googling, we understood that the H264 implementation varies between browsers, and that there are as many renderings as there are web browsers. Worst, we noticed that video rendering varies between different versions of the same browser, between OS (win8 v.s. win8.1), and evan between two seemingly identical configurations..!

We implemented a universal solution: draw the video on a canvas, read RGB value of a single pixel and update the background color:

var vid = document.getElementsByTagName("video")[0];
vid.onplay = function() {
+++var canvas = document.getElementById("canvas");
+++var ctx = canvas.getContext("2d");
+++ctx.drawImage(vid,0,0);
+++var imgData=ctx.getImageData(0,0,1,1);
+++r = imgData.data[0];
+++g = imgData.data[1];
+++b = imgData.data[2];
+++$('.main section.page1').css('background','rgba('+r+', '+g+', '+b+',1.0)');
};

That worked…on almost all configurations. There were still some cases where the RGB values returned by getImageData didn’t match the actual video color. (I now think it might come from a misuse of drawImage).

4th attempt: Copy and paste. This time we tried the most direct technique by drawing a portion of the video over a canvas that is then spread over the entire page to fill all the background. The following code reads a 1×1 pixel portion in the upper left corner of the video and draws it with drawImage over an HTML canvas. The background filling is done in CSS.

css:

canvas {
+++position: absolute;
+++top: 0;
+++bottom: 0;
+++left: 0;
+++right: 0;
+++width: 100%;
+++height: 100%;
}

js:

var vid = document.getElementsByTagName("video")[0];
vid.onplay = function() {
+++var canvas = document.getElementById("canvas");
+++var ctx = canvas.getContext("2d");
+++ctx.drawImage(vid,0,0,1,1,0,0,canvas.width, canvas.height);
};

Did it work? Not quite. We still had a color mismatch on some Chrome configurations. We could solve it by disabling hardware acceleration, but that’s not something we could impose on our kind visitors…

5th attempt: A little help from above. We tried again the previous technique, but with a bigger portion of the video of 300×300 pixels (of uniform color).

var vid = document.getElementsByTagName("video")[0];
vid.onplay = function() {
+++var canvas = document.getElementById("canvas");
+++var ctx = canvas.getContext("2d");
+++ctx.drawImage(vid,0,0,300,300,0,0,canvas.width, canvas.height);
};

Success, this was it! It seems that working on a single pixel that is spread to cover the entire background causes a color distortion. However the color is stable with a 300×300 portion. To do: check if this works with a smaller portion (10×10 for instance).

The final result: thehalvening.com

As a final word: a really pain-in-the-ass bug to solve, notably because all worked well on my PC. I couldn’t see the bug with my own eyes, which slows down debugging a lot.

A few ressources that saved me:
html5doctor.com/video-canvas-magic/ for the « copy & paste video on a canvas » trick
browserstack for testing a website across a wide range of configurations. The trial version include a 30-min remote acces to a real session with the selected config, which is quite a thing..!

Which technique for a web animation?

For the development of thehalvening.com website, which displays an almost full-screen animation on the home page, we had to select an animation technique among the numerous available possibilities.

Several constraints were to be taken into account.

Low size/duration ratio
It’s a loop animation with a 10-20 secondes duration. The size shall be around 1MB in HD resolution in order to have a light website and be able to host all the content on our server.

Native compatibility with all modern browsers
The technique shall have native support (no plug-in) from all recent versions of Firefox, Chrome, Safari (Mac only), and Opera. The animation is replaced by a fixed image on mobile devices.

Resizable
We want a responsive behavior: the animation shall scale harmoniously when resizing the browser window.

Graphic Designer friendly
Our animation is made from graphic elements designed on Illustrator that are imported and animated on After Effects. The technique shall integrate nicely in this workfow.

We have tested the following animation techniques:

-GIF: universally supported but to heavy for a 10-20 secondes animation.

APNG: Animated PNG, the ideal format in our case but unfortunately not supported by Chrome.

-« Animated GIFs the Hard Way« : nice trick made of PNG and js by Sublim Text developper, but not appropriate for an animation that is at the same time quite long and with large portions that moves around. And not resizable-friendly.

Body movin: an After Effects plug-in that exports in SVG + js format. Miraculous in theory, the hard truth is that it does not support all After Effects animation techniques and doesn’t work in our case.

-Spritesheets: Universally supported and really neat for video games. But too heavy for an HD animation of say 10s at 15fps (we want to stay below 1MB).

-Video: That’s the winning competitor in our very special case that compresses very well in H264.

Table summary:

techniques anim web-EN

Final word

We finally chose the video: exported in .mov from After Effects, then encoded in H264 in .mp4 format. The visual quality is excellent for a file size of 1058KB. With CSS we get a well-working responsive design.

Mission accomplished then? Not quite! That’s without the dreadful jungle of web browsers… Brace yourself and read along the next chapter of this story when you’re ready.

Shell script for Antminer S5 temperature regulation

Hi! In these hot summer days I’ve been working on a small shell script for (basic) temperature regulation of my Bitmain Antminer S5. Yes, for Antminer S5 ONLY.

In order to share this with others (and also as a personal reminder), you’ll find below the technical notes on this work.

NB: Although I don’t think there is any problem involved with using this script, it’s all at your own risk!

What you need to install the script:
– First download regul.sh and freqList from the github repository
– Find the miner’s ip address
Putty for ssh connection with the miner
Winscp for file transfer to the miner

Installation:
1) Copy the files to the miner with Winscp:
– Choose « SCP » File protocol.
– You’ll need login and password: root / admin by default.
– Transfer regul.sh and freqList to /etc/init.d

2) SSH connection to the miner:
– Use Putty to connect to the miner (port 22). – You’ll need login and password: root / admin by default.
– To launch the script, type: nohup sh /etc/init.d/regul.sh&
– The script will keep working after you close Putty.

What does the script:
Every 20 minutes, the script checks the current temperature T.
If T>TMAX: the frequency is reduced by 25MHz and the cgminer is restarted
If T<TMIN: the frequency is increased by 25MHz and the cgminer is restarted

The temperature taken into account is the max of the two values returned by the built-in sensors.

You can modify TMIN and TMAX at your will, by I recommend that you keep at least a 3-degree spread between the two temp for smooth regulation.
You can also tweak:
REFRESH_TIMER to change the time interval between two frequency adjustments, but I think 20 minutes is fine.
FREQ_STEP to define the frequency step at each regulation loop. The frequency step in MHz is given by 6.25*FREQ_STEP. By default it is set at FREQ_STEP=4, so that’s a 6.25*4=25MHz frequency increase of decrease at each loop.

To stop the script:
– type: ps and find the PID associated with the script
– type: kill PID


Please note that when you power off the miner, the script will be erased
and you’ll have to re-install it. I know it’s tedious but I haven’t figured a way around (yet).

You can access the temp regulation log by typing: vi /etc/init.d/nohup.out

Tip jar: 14kqJWcAQo9WYYJ71Xj7CECgitMNzxUBRj